Ssh to Computer Science
We as students of Computer Science have the privilege to be able to access all the computers at our department from anywhere. In this guide I will be explaining step by step how to access them. And give you some handy scripts and tips for using this feature. It’s a guide written specifically for this case but some but a lot of the elements can be applied elsewhere too (e.g. converting keys with Putty, EOF-conversion, ssh-agents,…). This guide is quite detailed ranging from setting up basic ssh to some scripting (both client and serverside) for making it easier to use ssh. This guide consists of 2 parts the first part is about getting started and the second part is about some convenience tools for further use.
Getting Started
Let’s start with the very beginning. You need to make sure that your student account is active and you need to generate a key pair. So head over here. And first check that your account is active. Is it active? Good! If not you should contact the department. Now for the keys. On said page you can choose to generate a new (your first) pair. If you followed the right link you should now be on a page that looks like this:

Read the guide there carefully and be sure to note down your _(hopef_ully long)key passphrase safely (I’d suggest a password manager). It might take some time for the keys to be generated but for me it was almost instantly. If they are successfully created you will get a link like this:
https://www.cs.kuleuven.be/restricted/ssh/keys/YOUR_USERNAME/
That’s were we will be heading next. There should be 4 files listed there. But you will need only one depending on what algorithm you want to use. I would advise picking RSA keys since RSA it is generally considered more secure. Next you need to copy the data of id_rsa (your private key) and save it in a file under the same name locally.
Key ready, passphrase secured. Then let’s download an ssh client. (Windows unlike linux does not support the ssh protocol natively.)
The best (windows) client to my knowledge is putty. I will be using 4 tools of the putty suite: putty.exe, pscp.exe, pageant.exe, puttygen.exe (as you can see below).
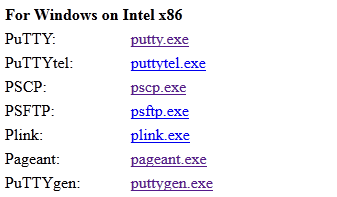
The specific functions of these 4 will become clear during this article.
First up is puttygen.exe. Putty uses a different format of keyfiles (with the same fuctionallity though). So next we will have to convert the key files we downloaded. Now open puttygen.exe and select Conversions and then import key.
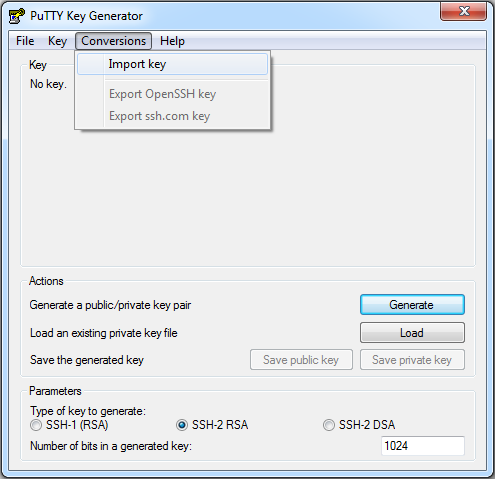
Now select the key file you made and input your key phrase for that key. Now we have imported the key (it’s an SSH-2 RSA key) we can simply save it in the format putty likes. Select save private key and save the file where you will find it.
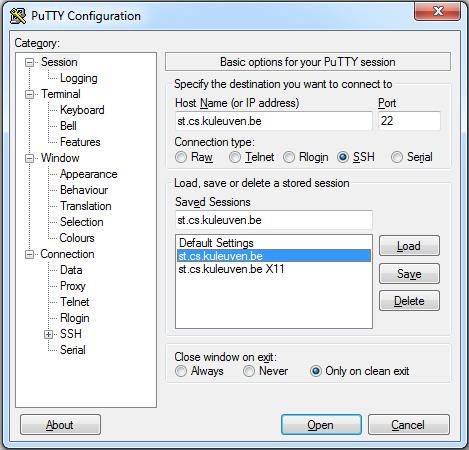
Now fire up putty.exe and let’s get into configurating your first ssh session. You may or may not know it but if you are currently not on the network of the KUL you need to connect to some sort of buffer server. So put in the field for the host name the following: st.cs.kuleuven.be
Leave the port as it is (22 will do just fine) and you can save these settings already.
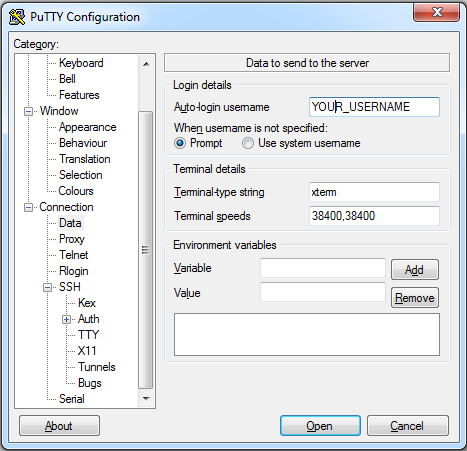
Two more things to do: Under “Connection” select data and write your username where asked.
And under Connection > SSH select Auth and browse to your private key. Save your session settings again in the Session tab (will be useful later on).
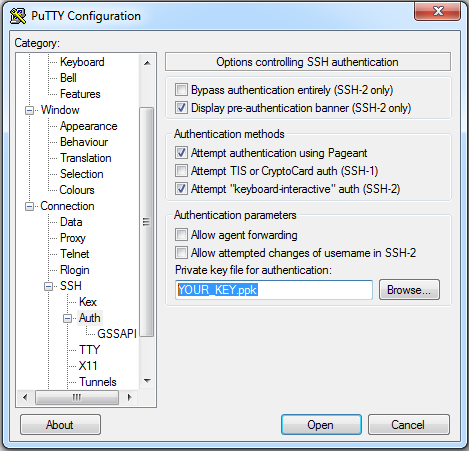
Now the real fun can begin. Only thing you need to do is press Open. A command line interface will pop up and ask you to fill in your key phrase. Once logged in you the server shows you a welcome message. Congratulations you successfully sshed for the first time. But hold on if you take a look around the system you will find that it might not really be quite what you expected. It is a somewhat basic system. You can’t even connect to the world wide web!
Now remember that this is a ‘buffer’ server that is stripped down for security measures. The real deal is to be found somewhere else. But where to look? Here is where to look: http://mysql.cs.kotnet.kuleuven.be. This page has all the real-time info on every host system you can connect to: the host names, the current load, downtime info, … Oddly enough you can’t seem to connect, well neither can I. To access this page we need to be on the kuleuven network. That’s quite contradictory since that’s what we are trying to do anyway. So I went to one of the workstations on the campus and made a copy of said site. But no need for you do do the same I found some names you can use and if they doesn’t work in part two i’ll give you a self written script that lets you download the site when you are on the buffer server. OK so lets try a host. Type in the following while on the ‘buffer’ server.
ssh $USER@hostname.cs.kotnet.kuleuven.be
sshmakes another ssh connection but now from the ‘buffer’ server to hostname.cs.kotnet.kuleuven.be.$USERis an environmental variable that holds your username.hostnameis a name you can find in the “hidden” list (use ‘ham’, ‘herent’ or ‘orval’ for example).
Again you will be prompted for your key phrase and look at that: This system looks more like it! This is a real workstation with all de benefits of the network and all the software you need. You can retrieve all the files you ever saved here ect.
One step beyond
That’s all good and well but there are still a few problems:
- For almost every file transfer or ssh connection you will have to fill in that (longish) key phrase.
- You don’t know which host is available since you can’t view the up to date info on the hosts from the ‘buffer’ server.
For problem one I got one client side and a server-side solution.
For the client-side solution we need pageant.exe. _Just run it, browse to your key file and enter you passphrase. Now the only thing you need to do is keep _pageant.exe running during all your sshing. The program will fill in you passphrase automatically every time you use your login for something.
For the server-side solution to problem 1 we need to run a script on the buffer server. I’ll first explain how to transfer files to there and how to fix an End-Of-Line problem since we will need both.
To transfer files from and to your computer we’ll use pscp.exe (pscp stands for Putty Secure Copy Protocol) because again windows does not support scp natively. To use it open up a command prompt window at the location where you put pscp.exe. Now type the following:
pscp -r -scp FROMDIR USERNAME@st.cs.kuleuven.be:/home/student/USERNAME/TODIR
This command will copy all files in FROMDIR (and possible subdirectories, that’s why we use the -r parameter) on your machine to the TODIR on the server if you replace USERNAME with your username ofcourse. You will be prompted for the password if you don’t have an agent running. Note that the files will be transferred to the buffer server not to the actual workstations. To do that you need to execute scp on the buffer server with as goal server one of the hosts. Transferring a file from the server to your computer is equally simple. Just reverse the last two arguments. So for some specific file MYFILE it would be something like this:
pscp -r -scp USERNAME@st.cs.kuleuven.be:/home/student/USERNAME/MYFILE C:
For convenience I use 2 simple batch scripts to copy to respectivly from the st.cs.kuleuven.be server: send.bat and get.bat. Just copy the code into a new text file and change the name (extension included) to their respective names. You can use these to copy the upcoming server-side scripts at once.
Once you get the scripts in place you need to change the End-Of-Line delimeter because windows and linux use different EOL delimeters for files. This gives problems when using a file made on windows and used on linux. You can fix the EOL for all the scripts (assuming you all gave them the .sh extension) by running the following command in the directory of all the scripts on the server:
sed -i s/\r//g *.sh
sed is a stream editor the -i flag stands for inline editing. Next you can read the parameters as: s/regexp/replacement/ in this case that means replace “r” (The extra EOL char of windows) with “” (nothing). The g behind that tells sed to replace the matched pattern and then *.sh obviously does this for every .sh file.
Alternatively you can change the EOLs in windows for example by using notepad++ EOL conversion.
OK now you can copy a script to the server and make it runable time to use some scripts then.
The serverside solution to problem one does essentially the same as the clientside one: running an ssh-agent. For this solution I wrote a small script that you can run automatically every time you log in to the server. When this script is set up you won’t have to bother starting an ssh-agent manually. The script only starts up a new agent if there is no agent already running with your username and keys. This way once set up you can fire up putty right away, enter you passphrase once and done. Only if the buffer server restarts (which is very rare) the script will prompt you to retype your passphrase when you log in. You can find the init_ssh-agent.sh script right here. Copy that to a text file and rename it to init_ssh-agent.sh (NOT .sh.txt).
Now with the next two scripts we can solve the second problem too. The first script(hostsToTxt.sh) downloads the html page with the info on the hosts and converts it to a text file. The second script(retriveHosts.sh) uses the first script to try and retrieve the text file from multiple hosts (in each room one host currently). As soon as we retrieved the text file the script exits. Now you can find the text file in the given directory and find out which hosts are available. If every host failed we are out of luck and this would mean there would probably be serious maintenance going on.
Now I roughly explained how the scripts(for more detail look at the comments in the scripts) work and how to get them there. First thing I always did when I logged in is run these two scripts manually. But if you ssh often it is useless to do that. Just open the file ~/.bash_profile and add the next two lines to what ever is there (probably nothing).
source scripts/init_ssh-agent.sh
bash scripts/retrieveHosts.sh
This will tell the bash shell that every time you log in you want to run init_ssh-agent and use it’s environment variables (Needed because the ssh-agent needs them) and after that use retrieveHosts.sh to download the host file. Don’t switch their places or you will be asked to type your passphrase multiple times while running retrieveHosts. I assumed in this file that you placed the scripts in ~/scripts which is a good idea anyway because hostsToTxt.sh needs to be there to let retrieveHosts.sh run correctly. (You can however modify retrieveHosts.sh to use hostsToTxt.sh from another location)
When this is all set up you will notice you can ssh and do everything you want but you still have to enter your username for everything you do. Plus the agent you are running here isn’t necessarily forwarded to other hosts. Both are easily solved by creating the following file: ~/.ssh/config
Write in it the following:
Host *.cs.kotnet.kuleuven.be
ForwardAgent yes
User YOUR_USERNAME
If all this is set up properly you now have a very easy way to ssh to the KUL workstations.
tags: bash - cs - kul - putty - script - ssh - windows - windows ssh client